


Quest Summary
Extended Companion Quest in
The Outer Worlds 2
Algid Menagerie is a medium-sized lab dungeon in The Outer Worlds 2. The level continues the Main Objective (from the Frozen Maw) of the engaging, emotional, Companion Quest for Inez, titled A Most Extraordinary Specimen. After unlocking the suspiciously inaccessible elevator, players and Inez will arrive at an ominous lab, full of deep dark secrets and clear signs of creature experimentation. Inez anxiously suspects the doctor that her comrade mentioned is somewhere deep within this Lab, along with other tragedies. At face value, a distractedly angry Grafted Ursopod has trapped the suspected Doctor in his office. He beckons for help, and his fate lies in the player and Inez's hands.
In this lab dungeon, the player will find a number of RPG Skill options that will allow them the ability to accomplish the Main Objective and deal with the dungeon Mini-Boss. The dramatic quest comes to an end when the player is faced with a difficult decision to make with Inez that can help her come to terms with the truths she'll eventually come to realize. Depending on the decision the player's CAN make, they can potentially improve, or negatively impact the player relationship with Inez.
Design | Team Goals
As a Team, we wanted to create a dramatic, emotional, memorable, fun companion quest with a rewarding payoff, that would serve as a pivotal moment between the player and Inez's connection in TOW2. Through collaboration with the narrative team to make sure the emotional beats and pacing was appropriate, and collaboration with the artist to make sure the intended vision was met from narrative and concepts, we collectively arrived at what I believe to be one of the strongest Companion Quest in The Outer Worlds 2.
Role: Area Designer
Responsibilities:
-
Blockout area layout
-
Combat Encounter setup
-
Loot Placement
-
Co-Conversation setup
-
Heavy Collab. w/ Art & Narrative
-
Visual Scripting/Blueprints
-
Digital Documenation & Maps
Bree Guthrie, Concept Artist

Team Pod: 3 Devs
Engine: Unreal Engine 5
Level Type: Combat POI
Development Time: 2 years


It was important to establish the opening shot and vibe of the lab. Through collaboration with the art team on capturing effective mood lightning, and environmental storytelling, we were able to ominously foreshadow the lab
Lab Entrance - Quest Progression
After the player exits the elevator, they are met with the voice of a desperate Doctor, crying out to the player for help. He exclaims he's held up in his office by "creatures".
Inez expresses urgency and the intent to relentlessly deal with the Doctor when they eventually come face to face.
The first clear sign of biological experimentation appears here, where the player can find a dead, abandoned Raptidon suspended in a tank.
Zyranium Leak - Quest Progression
Making the way around the previous corner, the player will find an apparent Zyranium gas leak, a Terminal, and even more environmental storytelling.
To the left, the player observes a hall full of toxic gas, impeding the path forward. Should the players own the Shield Gadget, they can safely run through the hazard, unscathed.
Ahead, the player sees the Terminal, which contains logs from a Engineer (deceased) who came to fix the leak, but apparently he only worsened the leak, causing a pipe-pressure explosion. If the player has the Hack Skills, they can disable the leak via the Terminal.
Lastly, if the player explores, they'll find a maintenance tunnel that, spits the player out past the gas leak in the hallway.


Zyranium Leak

RPG Options to bypass the gas

The Source of the Zyranium Pipe Leak
Zyranium Leak

To the right, the player will find a maintenance closet with Raptidon cub that appeared to kill the Engineer working on the gas leak. An audio log of the Engineers demise can be found here. If the player takes the ladder down, they'll find a RPG interactable valve that will disable the Zyranium leak. It can only be used if the player possess the adequate Engineering skills.
Design Intent and main focus in this area was to make sure the space supported multiple ways to deal with the Hazard before them. This is well into Phase 2 of The Outer Worlds 2, so they should have a number of ways to progress, based on their RPG Build.

Subject Observation Hallway

Botched Grafted Experiments

Experimented Raptidons roaming the halls
Subject Observation Hallway
Hallways
- Quest Progression
If the players are able to clear the Zyranium leaks, that'll allow them sometime to see further more environmental storytelling within these lab windows. Butchered creatures can be seen like: Mantisaurs, Raptidon, and Raptidon cubs can be seen through these windows. Specifically non-native species, so this shows the creatures were imported to this lab by an operation.
Through the halls of the lab, player will find other uncaged creatures, like scurrying Sprats...and ferocious Raptidons. They too were once caged and used for experimentation as well.
Zyranium Leak Hallway (Cleared)
Grafting Room - Quest Progression
In this room, Inez discovers she is too late, and her friend Trooper Ortiz has died from Grafting Experimentation. She's deathly devastated and seeking revenge. Terminal logs suggest other subjects are still in the lab.
In this room, more clues of experimentation are visible. A butchered Raptidon, an abandoned Crabble, and bile jars of creature parts suspended throughout the room along with a terminal log detailing every kind of species/experiment in the lab, has been documented.
The logs appear to mention a Mother Ursopod and a cub, deep within the lab that have been separated. Other creatures are mentioned to be caged elsewhere. This triggers Inez's urgency for her mission to not only find the doctor for what he's done to Ortiz, but also, all these creatures.
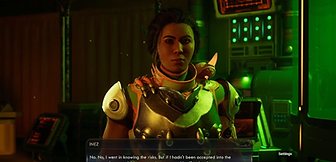
Inez expresses anger & concern at the discovery

Trooper Ortiz Incubation Chamber

Design Intent: Through use of Lighting, and Art we created the storyboard vibe we wanted for this emotional moment in-game with Inez. Sprinkling environmental storytelling bits in the form of loot of creature parts
from The Outer Worlds 1 & 2), and physically placing the creatures/critters throughout the lab that were logged in the Terminal documents was so much fun

The player will have 2 paths they can take in the Hallway, to resolve the Main Objective and get to the Doctor. The Design Goal for this branching area was to rewarding players with RPG Skill options and awesome loot for exploring
Doctor Located
- Quest Progression
After exiting the Grafting Room and into the Hallway, the player and Inez will lay eyes on the Doctor from another room.
He acknowledges the party's presence and has clearly barricaded himself in the office, after being attacked by the Mother Ursopod for not only experimenting on her, but separating her from her cub, and experimenting on it as well.
The efforts of the Lighting Team really helped with making sure The Doctor was revealed appropriately, from afar.
Caged Creature Room
- Quest Progression
The Hallway option to the right, leads the player to the the Caged Creature Room, holding some of the smaller critters like Sprats, Bred Worms, and a friendly Cysty Pig.
Upon opening the door, a small Sprat will dart out of the room. In this space, the player will find many things to exercise their RPG Skills and interact with things for interesting loot, and Mother Bear Interactions. Details below!
Additionally, this pathway leads the player straight to the Main Combat Floor via a crouch tunnel in the restroom.
If the player explores and finds The Doctor's Locker Key in the Medical Wing, they can Lockpick this chest to acquire The Critter Catcher gun, which can turn wild creatures into Pets!

Caged Cysty Pig - Pet

Caged Cysty Pig - Pet

Caged Cysty Pig - Pet
Caged Cysty Pig - Pet
If the player discovers the Caged Creature Room, they can free a Cysty Pig if they've the Lockpick Skills. After freeing the Pig, the player will then have the option to acquire the Pig as a pet...or Leave It

Release Caged creatures to fight Mother Ursopod (2 Raptidons + 1 Mantipillar)

Caged Bredworm
Release Caged creatures to fight Mother Ursopod (2 Raptidons + 1 Mantipillar)
If the Player has enough Hack Skills, they can Release the Caged Creatures (Raptidons & Mantipillar) on the Main Floor, launching an assault on the Mother Bear, thus making your fight slightly easier.


Critter Catcher Locker

Critter Catcher Locker
Critter Catcher Locker


Ursopod Cub Operation Room

Location of Ingredients
Hallway Raptidons
Ursopod Cub Operation Room

The player requires the Medical Skill, and 2-3 ingredients to be able to create the Serum to cure and awaken the Ursopod and reunite the Cub with their Mother.
Medical Wing
- Quest Progression
The Hallway option to the left, leads to a pair of hungry Raptidons that were also mentioned in Data logs. Past the Raptidons, the player will find the Medical Wing. In this room the player immediately realizes what has had the Mother Ursopod's attention. The Ursopod cub visibly appears to be Sick. The player has the closest view to the Mother Bear in this room, and she sounds PISSED. If you explore the room, and the examinables, you'll find that the player potentially has what's needed to concoct a Cure for the Ursopod cub.
On a lab table near the Cub are ingredients needed to make the cure (as well as Doctor Rasmussen's Key card to acquire the Critter Catcher). Curing the Cub gives the player non-aggressive, combat free-route, of bypassing the Mother Ursopod.

Main Combat Floor

Main Combat Floor

Dr. Rasmussen
Main Combat Floor
Main Combat Floor
- Quest Progression
Depending on the player's decision, the conditions with which the player enters this room will be based on the choices they made previously. Did you Save the Cub? Did you get some extra assistance to help fight the cub by Releasing Caged Creatures.... Did you Kill the Cub and send the Mother Bear into a rage?
On this floor you'll find cages for the larger creatures, 2 Raptidons, 1 Mantipillar and a Grafted Ursopod corpse left to die. You'll also find the Mother Ursopod's cage destroyed, as she escaped in an apparent rage after seeing her Cub.
However you deal with the Mother Ursopod, the player will then be able to speak with Doctor Rasmussen.
Design Goals for the space consisted of creating a relatively open space that supported a Mini-Boss fight and had 1-3 traversal gameplay loops that could help navigate a fight against 2 Space Bears


Mother Ursopod
Kory Molohon, Character Art
The Decision
- Quest Conclusion

Mantiswarm Hive
Graft

Mantiswarm Hive
Graft

Mechanical
Augmentation
Graft
After the player has dealt with Mother Ursopod, they can now speak to Dr. Rasmussen. It's at this point after some detailed dialogue, that the player will have the opportunity to influence Inez's decision on how she wishes to handle Dr. Rasmussen. Inez deeply express grief, but entrusts you with your opinion, in this very intense, emotional moment for her, as she comes to terms about the grafting program she was a victim of.
As a bribe, the Doctor will offer Inez an upgrade to her graft by having the choice of either the Ursopod or Mantiswarm graft, but only if you Spare his life. If the player chooses to Kill Dr. Rasmussen, they can remove the mechanically augmented graft from The Doctor's body for installation instead. The player will receive access to a pathway that leads them back to the elevator along with some additional loot on the way out. The quest concludes when the player takes Inez to Paradise Island, to have Ethel (an AC biologist) install the graft upgrade of her choosing that she acquired.
Extra Details: If the player convinces Inez to Spare Rasmussen, and the player themselves decide to shoot Rasmussen, Inez will respond negatively and heavily consider leaving the Party. If the player also chooses to Kill the Cub, it's a large chance that she will likely depart from the Party after exiting the Lab.


Inez Graft Concepts

Inez with Ursopod Graft
Inez Graft Concepts
Bree Guthrie, Concept Artist
Gallery


Development Challenges
We wanted to create a dramatic, emotional, memorable, fun companion quest that would serve as a pivotal moment between the player and Inez's connection in TOW2. Through collaboration with the narrative team to make sure the emotional beats and pacing was appropriate, and collaboration with the artist to make sure the intended vision was met from narrative and concepts, we collectively arrived at what I believe to be one of the strongest, if not strongest companion quest in TOW2.